


Key Takeaways
This is the final post in our three-part series based on the webinar Next-Generation Aerospace Surface Preparation with Plasmatreat:
- What surface prep methods are available for aerospace composite bonding? (Part 1)
- How do you verify that your prep worked? (Part 2)
- What contact angle should you target for good bonding? (This Post)
The short answer
It depends on your materials, so the right number comes from testing. But in the bonded composite data Lucas Dillingham, Brighton Science's Global Applications Director, shared in the webinar, a clear pattern showed up:
|
Water contact angle |
What the bond testing showed |
|
About 20° to 40° |
High fracture toughness, very little interfacial failure. A reliable process. |
|
About 50° to 60° |
Mixed failure modes start to appear. The process is at risk. |
|
Above 70° |
Bonds fall apart. |
Lucas calls these good rules of thumb, not a universal spec. The rest of this post shows where they come from and how to find the right number for your own process.
Why contact angle tracks bond strength
Contact angle and adhesion respond to the same thing: the chemistry of the top few molecular layers of a surface. That chemistry is set by:
-
The type of surface treatment
-
How much treatment the surface got
-
Whether contaminants are present, and what kind
Change any of those and both the contact angle and the bond strength move. That's why researchers have been able to line the two up across many materials, adhesives, and prep methods. Three examples from composites:
Example 1: Silicone contamination on peel-plied composite
Under the DARPA TRUST program, Southwest Research Institute and Lockheed Martin Skunk Works contaminated peel-plied carbon fiber/epoxy surfaces with varying amounts of silicone, measured contact angle, then bonded and tested them.
- Below about 50°, fracture toughness stayed high and almost none of the joints failed at the interface.
- Right around 50°, toughness dropped sharply and interfacial failure jumped.
- By 70° and above, joints failed entirely at the interface.
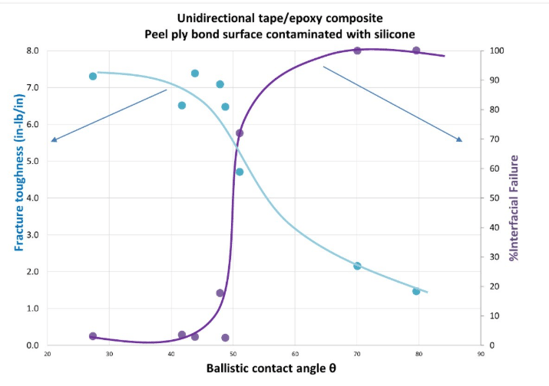
Mode I fracture toughness (blue) and percent interfacial failure (purple) vs. contact angle for a unidirectional tape/epoxy composite. Data generated under the DARPA Phase II TRUST program (2015) by Southwest Research Institute and Lockheed Martin Skunk Works. Read the paper.
This is the curve behind the rules of thumb above.
Example 2: Different peel plies, different bonds
Researchers in France compared six peel plies on carbon/epoxy and glass/epoxy laminates. The plies left surfaces between about 43° and 76°. The three plies with the lowest contact angles (43° to 44°) produced the strongest lap shear joints on both laminates.
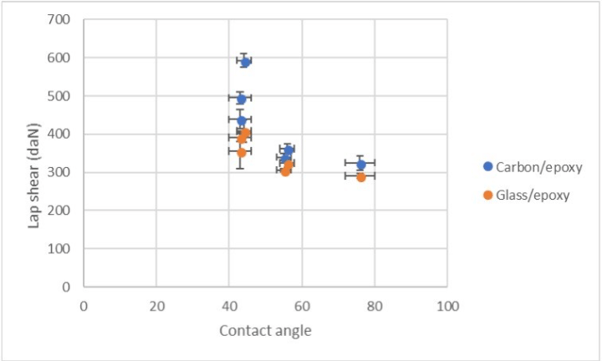
Lap shear strength vs. contact angle for laminates prepared with six peel plies. Data from Q. Bénard, M. Fois, M. Grisel, Composites Part A 36 (2005) 1562–1568.
It's a good reminder from Part 1: peel ply works, but not all peel plies leave the same surface.
Example 3: Where the failure mode changes
In a study of epoxy/composite adhesive joints, surfaces below about 27° failed cohesively, inside the adhesive. Above that, joints failed at the interface, and toughness fell steadily as contact angle rose.
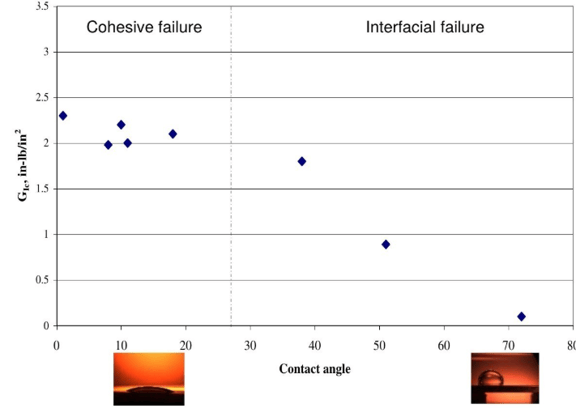
Fracture toughness vs. contact angle for epoxy/composite adhesive joints. Data from R.G. Dillingham and B.R. Oakley, J. Adhesion 82 (4) (2006) 407–426.
Notice the switch point here (about 27°) is lower than in the DARPA data (about 50°). Same trend, different system. That's exactly why your limits need to come from your own materials.
How to find your own number
Build a curve for your process:
- Prepare surfaces across a range of contact angles, for example by varying sanding, plasma settings, or cleaning.
- Bond them with your adhesive and cure.
- Break them and record strength and failure mode.
- Find where performance starts to drop, and set your limits inside the range that performs well.
Here's what that looks like for a sanding process on a composite. A solvent wipe alone left the surface around 75° and the joints held about 500 lbs. Sanded surfaces measured between about 30° and 37° and held roughly 1,800 to 2,350 lbs.
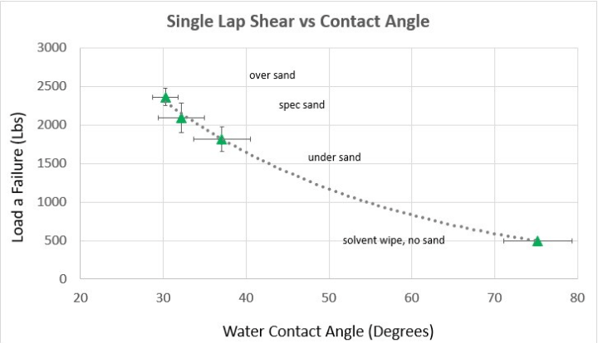
Single lap shear load at failure vs. water contact angle for a composite surface prep process. Data: Brighton Science.
With a curve like this, you can write a number into your spec, and contact angle becomes the control limit when the process moves from the lab to the production floor.

Why a pass/fail check isn't enough
Surfaces generally start passing a water break test somewhere below 50°. So a water break test can't tell a 20° surface from a 48° surface. Look back at the DARPA curve: those two surfaces sit on opposite sides of the drop-off.
Consistency counts as much as the average
A low average isn't the whole story. In the University of Washington study covered in Part 1, flame treatment brought the average contact angle down a long way, but with wide variation from spot to spot. Plasma gave both a low average and a tight spread.
When you set a spec, define:
-
The target range
-
The allowed variation across the part
-
How long the surface can wait before bonding (see Part 2)
An example: peel ply plus plasma
In the webinar, a freshly peeled composite measured around 40°. After plasma treatment, the same surface measured around 13°, well inside the reliable range.
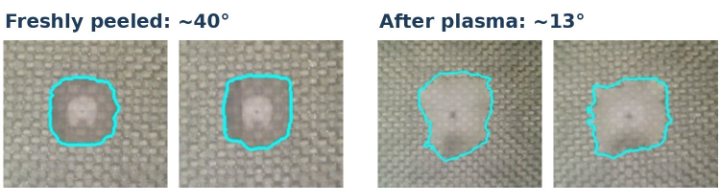
Water drops on a freshly peeled composite (left, about 40°) and after plasma treatment (right, about 13°). Data: Brighton Science.
Turning your target into a control plan
Once you have a target, the next step is a control plan: where you measure, what the limits are, and what happens when a part doesn't pass.
A plan like this means engineers and operators don't have to make judgment calls on the floor. The benefits:
- Lower risk: surface problems get caught before bonding, not after a failure.
- Fewer bottlenecks: clear pass/fail limits keep parts moving.
- Less rework: a part that fails gets re-prepped right away, instead of being bonded, tested, and scrapped.
Note: your pass/fail limits must be established for your own materials, adhesive, and process.Series wrap-up
Series Wrap-up
Across the three posts:
- Any of these processes can be effective and successful with the appropriate controls in place.
- Control means measuring the surface, close to the time of bonding.
- A contact angle target, backed by your own bond testing, gives you a spec you can hold every part to.
Watch the full on-demand webinar here, or contact Lucas Dillingham at ldillingham@brighton-science.com to talk through your own bonding process.